
Photoshop is widely used nowadays in almost every field. It is used for many purposes, including creating, modifying, and editing photos. Photo editing services have relevance in every industry for which the demand has been shooting up. You will find different software for creating and editing, often used by beginners and professionals alike, and have a range of tools that help transform even a simple photo into something amazing. Fill tools have a vital role to play in editing your photos.
Fill tools are excellent and can enhance the look of the photos when used properly. First, one must know what exactly fill tools are. These are a set of tools that allows you to fill a particular area, layer, or object with colour or pattern.


Using Fill Tools in Photoshop

You can master editing art in Adobe Photoshop with the Photoshop fill tool – Paint Bucket and Gradient.
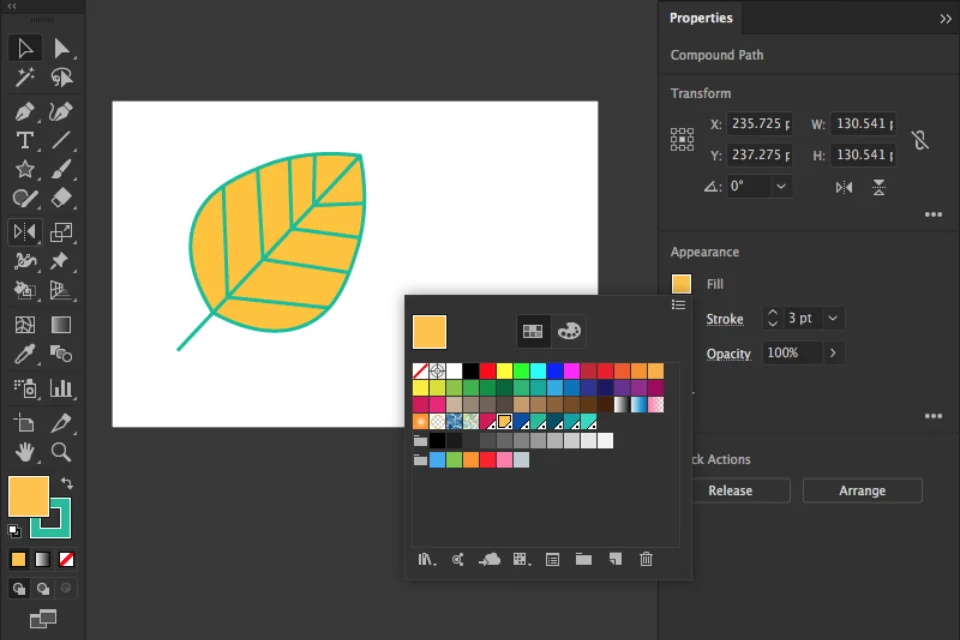
The tools are located in the toolbar on the side screen. Clicking on the paint bucket icon activates the fill tools. Following the click, the menu bar pops up two options (paint bucket fill option and gradient option). The gradient tool looks like a box with two different shade colours. Using either of the fill tool photoshop enables you to add a shade, colour, or pattern to certain areas in your photograph or a design project.
The Paint Bucket fills the selected area with a pattern or colour when you click on a pixel from that area. For instance, if you want the blue pixels of the image replaced with red pixels, choose the primary colour, red and click anywhere on the blue pixels.
Optimal usage of the Paint Bucket tool
The paint bucket tool works as a magic wand for creative people, bringing out a splash of colours in the photograph. It has certain parameters in its options panel. Let’s see what these parameters are.
-
Fill an area.
Is there a specific area in your photograph that needs to be filled with colours? If there is, a paint bucket tool will do that with a single click.
-
Colour foreground as well as background.
The paint bucket tool makes it easier to fill in the area with your choices of two interchangeable colours – one for the foreground and another for the background.
-
Use the Paint bucket in sync with other tools.
Fill tools like the gradient tool, pen tool, and brush tool can also be combined with the paint bucket tool to bring out complex illustrations and carry out special edits.
-
Work with selection and layers.
The colour palette of Photoshop fill tools is usually limited. Sometimes you must develop your colours, which can be done by using a variety of selections and versatile layering options.
You might be wrong if you think that the paint bucket tool is only to fill a selected area with one particular colour. It has more advanced options and setting to create a better and smarter edit. Some of these options are listed down below:
-
Pick a mode.
The mode setting of the paint bucket tool helps you to add more interesting fills with a higher degree of control. Toolbar options like multiple, darken Colour Dodge, and more offer varied effects. For instance, if you choose the darken mode, all the pixels lighter than the primary colour are replaced.
-
Opacity
This parameter allows you to set the transparency of the photograph.
-
Tolerance
Tolerance decides how many pixels the fill colour will cover. The parameter accepts values ranging from 0 to 255, based on which the range of the colours is affected. It also creates a random yet artistic painting effect.
-
Go deep with layers.
Usually, the paint bucket tool fills only selected layers. However, if you want to fill through the entire project with the colour options, you must choose the “All Layers” option. It often comes in handy in changing the entire document. If the “All Layers” option is left unchecked, only the active layer gets filled.
-
Anti-aliased
If you want to differentiate between filled and unfilled areas, check the anti-aliased option. Doing so creates a translucent border between the two while smoothening the jagged edges. Do not check the anti-aliased option if the effect is not desired.
Gradient Tool
Yet another tool to fill colours is the gradient tool, which starts filling with one colour and gradually changes the shade.
The steps to do a gradient fill are quite simple and are mentioned here:
- Step 1 – Select the area you want to fill with the gradient. If the entire layer needs to be filled with the gradient, do not make the selection.
- Step 2 – From the toolbar, choose the gradient tool
- Step 3 – Set the primary and background colours. The primary colour is the first, and the background colour is the last colour of the gradient.
- Step 4 – In the options panel, set the parameters for the tool.
- Step 5 – Take the cursor inside the selected area and move it.
- Step 6 – Press the left button of the mouse and move in a straight line while keeping the button pressed. The primary colour begins at the starting point, and the ending point is where the background colour will be. The straight line length determines the transition phase from one colour to another. Shorter lines show a sharp transition, while longer ones do not.
The gradient parameters that you will find in the options panel are the following:
- Gradient
- Gradient style
- Mode
- Opacity
- Reverse
- Dither
- Transparency
If you want to create a complex gradient containing more than 3 to 4 colours, you should use the gradient editor.
Conclusion
The fill tools can make drastic changes in your graphic design project or the photograph you’re editing. Without the fill tools options, your edits may lack something you would not want. To know more about this, visit Trendingcult.