

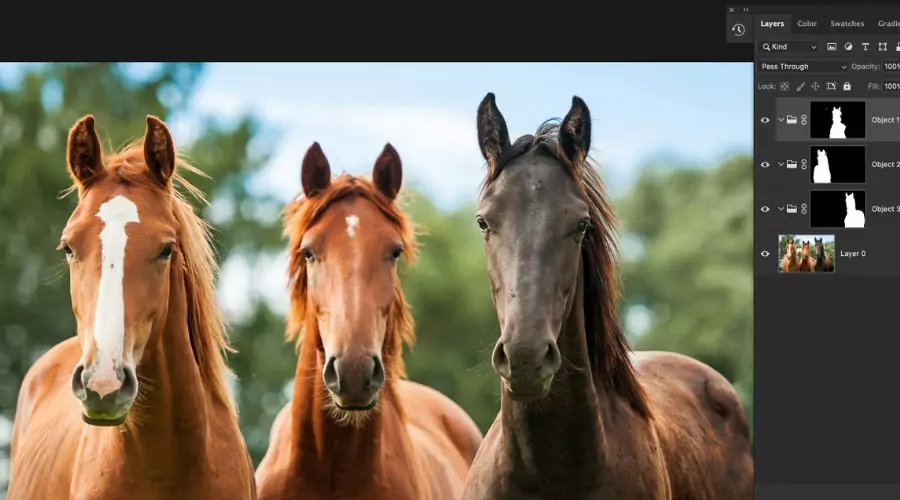
Many image editing software packages, including Adobe Photoshop, provide an attribute called the object selection tool. It enables users to choose particular objects or areas inside a picture swiftly. Often, this tool extracts a specific object from its background to be edited separately or deleted entirely. An algorithm is used by the tool to find an item’s edges within a picture. The tool makes a selection around the object once these edges have been located, enabling the user to move or change it without disturbing the rest of the picture. The object selection tool in Photoshop lets us perform all these tasks.
Designers, photographers, and artists can benefit from the object selection tool when working with complicated photos containing several objects. The Photoshop tool is useful not only for professionals but also for novice photographers and enthusiasts who wish to advance their abilities in image editing. The object selection tool is a potent feature that may help users produce outstanding outcomes with their photographs, thanks to its user-friendly interface and automatic selection procedure.


Learn How to use the Object Selection Tool with Adobe
Using the object selection tool is simple and can be divided into many important parts. Here, we’ll consider Adobe Photoshop, one of the most widely used image-altering applications. We’ll review the steps you can take to use this tool efficiently.
The first step is to open Photoshop and the image you wish to modify. Launch Photoshop and select File > Open to accomplish this. Choose your image file by navigating its directory and clicking the Open button. The screen will now display your image.
The Object Selection tool Photoshop must then be chosen from the toolbar. The Magic Wand and Quick Selection tools are in the same group as this one. Choose the Object Selection tool from the fly-out menu that appears when you click and hold the Quick Selection tool icon.
The tool’s settings can be changed after you’ve chosen it to fit your requirements better. These conditions consist of the following:
- Selection type: Rectangle and Lasso are the two selection options available with the Object Selection tool. Whereas the Lasso option makes a freehand selection, the Rectangle option creates a rectangle selection around an object. The option that best fits the shape you wish to select is yours.
- Selection Modes: Automatic and Manual are the two options for the Object Selection tool. The object in your image is automatically recognised and selected by automated mode using Adobe Sensei technology. You can manually create a selection around the object in manual mode. The mode that best meets your needs is your choice.
- Selection Brush size: You can change the size of the selection brush that was used to make the selection. With this, you can choose between the image’s smaller and larger objects.
- Edge detection: The Object Selection tool uses edge detection to choose the object precisely. To fine-tune the selection, you can change the edge detection settings. Sharp, Regular, and Smooth are the available options.
You can select once you have customised the Object Selection tool’s settings to your desire. Simply click and drag your cursor over the object you want to pick to accomplish this. The Object Selection tool will automatically identify the object and make a selection around it if you are using Automatic mode. You must manually create a selection around the object using Manual mode. You might discover that the tool includes portions of the image in the selection that you don’t want to include. If this occurs, you can remove these areas from the selection by clicking on them while holding down the Windows Alt or Mac Option keys. After making the initial choice, you can tweak it to get a more exact result. To achieve this, select the Refine Edge button from the Options bar at the top of the screen. This will launch the Refine Edge dialogue box, which provides a number of tools for fine-tuning the selection.
Edge Detection tool
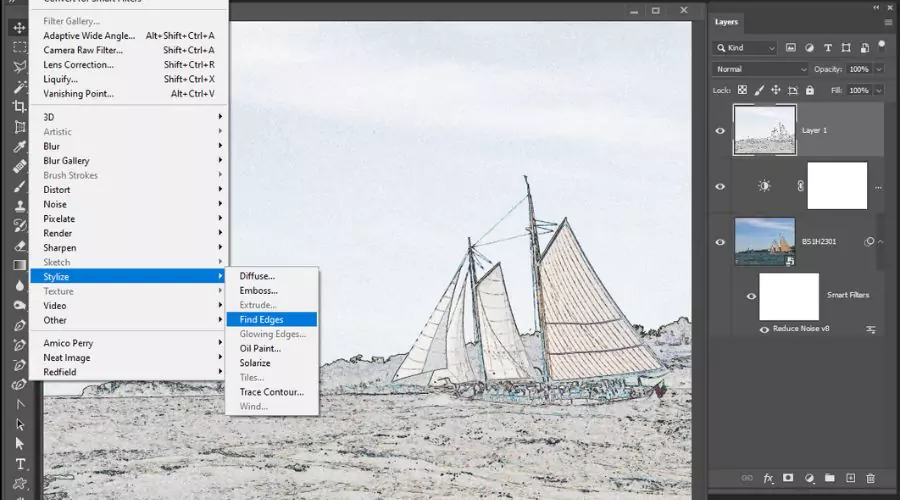
The first tool is the Edge Detection tool, which lets you change the settings for edge detection. This is useful for choosing items with intricate edges, like hair or fur. Smart Radius, Decontaminate Colors, and Edge Detection are some possibilities.
Refine Radius
The second tool is called Refine Radius. It lets you choose the size of the selection brush and how much feathering is on the selection’s boundaries.
After making the initial choice, you can tweak it to get a more exact result. To achieve this, select the Refine Edge button from the Options bar at the top of the screen. This will launch the Refine Edge dialogue box, which provides a number of tools for fine-tuning the selection.
Output Settings tool
The third tool is the Output Settings tool, which lets you decide how the selection will be output. The selection can be exported as a Layer Mask or a New Layer.
Conclusion
In image editing software like Adobe Photoshop, the Object Selection tool is a potent feature that enables users to rapidly and precisely identify particular objects or areas inside a picture. Designers, photographers, and artists often find the tool especially helpful when working with complicated photos with several items or subjects. Amateur photographers and hobbyists can also use it to hone their image-editing skills. Understanding how to use the tool effectively can greatly speed up image editing and produce stunning results. This programme can help users create professional-quality photographs while saving time and effort because of its user-friendly interface and automatic selection procedure. It’s crucial to remember that the intricacy of the image and the level of detail needed for the selection determine how effective the tool will be. Users might occasionally need additional selecting tools or manual methods to get the desired outcome. Users may master the tool and other capabilities of their picture editing programme through practice and experience. All things considered, the Object Selection tool is a useful tool for everyone who works with digital photographs and desires to produce eye-catching and significant designs. We hope this article from Trendingcult helped you know how to use the Object Selection tool.