For decades, Adobe Photoshop has been the first choice for editing, designing, and creating. This software has helped billions over the years to reach their design goals, and that too at a minimal or no cost. Imagine and create all the beautiful designs, images, paintings, and graphics just like you imagined. Are you at the beginner level? No worries, Adobe Photoshop has got you covered through its easy-to-use tools and tutorials. All the tools and elements in this software are easy and convenient to use. One such tool is the quick selection tool.
The quick selection tool is used for selecting any particular part of the image and altering it as seen fit. This tool of Adobe Photoshop is well known for its precision and time-saving qualities. It selects a particular part of any picture and lets you work on it with great ease. The higher the resolution of the picture, the better the working of the tool. Give your image accuracy with the Photoshop quick selection tool. Let us dive deeper into the need, information, and usage of this tool for editing and enhancing the quality of your work.
Basic Steps to Know Before You Use the Quick Selection Tool

To learn how to use the quick selection tool, let us first learn about the user interface, that is, your work area and its important elements.
- As you take a look at the user interface of Adobe Photoshop, you see a vertical toolbar on your left side, the colour panel and the layer panel on your right side, and the horizontal menu bar right on top of the screen.
- Get the new canvas to work on from the new option in the menu bar.
- A dialogue box will appear before you on the screen. From here, name your canvas or the clipboard. When you click ‘Preset’ in this dialogue box, you will see various canvas design. Choose the one you find most appropriate, or click on custom and decide the dimensions of your canvas by yourself.
- Change the width, height, colour, and resolution according to your needs, and then click on the ‘OK’ button once you are done.
Now, once the canvas is on your screen, you are free to use any Photoshop tool like the Elliptical Marquee tool, Magnetic Lasso Tool, Quick Selection Tool, and many other tools and features to give your images and work a better quality.
Steps to Use the Quick Selection Tool

Once you get a better understanding of the user interface, using the quick selection tool Photoshop becomes much easy. This tool is very easy to use. It is present in the left toolbar of your screen, usually the fourth option from the top. It is represented with a brush symbol. Learn how to use this tool effectively through the following steps –
- Pick any image, whether downloaded from the internet or clicked by you. Make sure that the resolution of this selected picture is high since the quick selection tool works on the fundamental principle of colour difference. Low-resolution images will not be able to give the desired results.
- Locate the ‘File Menu’ in the menu bar on the top. Click on the ‘Paste’ option to bring this image to your screen.
- From the dialogue box that will appear on the screen, go to the location where you saved the image that you want to use and click on it. Once you click on the image, a permission box will pop up. Click the ‘Place’ button, and your image will be in your work area. You may also directly drag and drop your image from the folder where the image is saved to your screen.
- Press ‘Alt’ on your keyboard and scroll up and down to zoom in and out of the image, respectively.
- Tab on the quick selection tool on the tool panel on the left side of the screen.
- You can also increase and decrease the brush size by clicking on ‘[’ and ‘].’ These square bracket buttons make it convenient to manage the brush size through the keyboard and give you the exact dimensions.
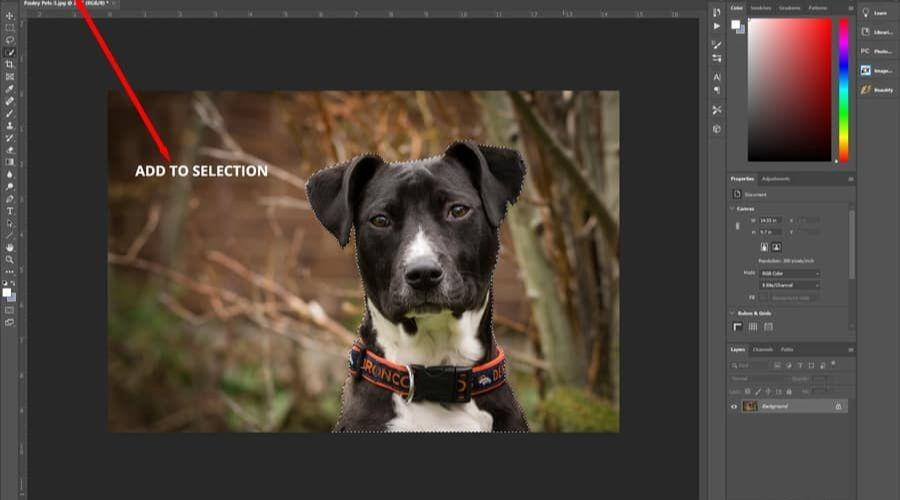
- Select the area you wish to move and move your mouse pointer in that direction.
- If, by any chance, you have selected more than required, you can delete it by continuously pressing the ‘Alt’ button and then clicking the open square bracket ([). The unwanted area will be cut, and now you can drag your image to its position.
- The selection of this particular object is now complete with the help of the quick selection tool.
- Press Ctrl + J to separate this selection from all the other objects of the image. If you hide the original image now, you will be able to see the separate layer of your selected object.
In addition to this, you can add and subtract many selections by simply clicking on the ‘Add Sectional’ and the ‘Remove Sectional’ options. You can change the brush parameters accordingly as well.
Conclusion
The Quick Selection tool is an important tool and can help you achieve perfection and a finishing touch to your work. If you need to restart the editing at any point, click Ctrl + D and reset to begin it again. Having enough knowledge of this tool saves you time and enhances your image. To stay updated on more interesting and important topics like this one, check out the trending cult website.

